Collection Item Elements
These are all the elements that you can add inside the collection item of a WooCommerce Collection List Wrapper.
Title
The Title of the product can be added either to text elements or to link elements, if you use the latter it will also automatically link to the product page.
Add the attribute:
itemtitleFeatured Image
The featured Image is the main image attached to a product, you can use the featured image on Images or any element as Background Image (don't forget to add a placeholder image and stylize it, the archive image will follow that image style). If you add the attribute to a link, it will also directly link to the product page.
To create a futured image just use the attribute
itemfeatured-imageto change the size of the featured image, you can add the following optional attribute:
dimensiondimension of the imageAs for valid dimension you can use:
full, medium, thumbnail, larger or width, height
For example to set a fixed size image of 300x500 add the attribute
dimension300, 500Please, mind the space between width and height.
Permalink
The permalink is simply the url to the current product page. Just add the attribute on a link element of any type:
itempermalinkShort Description
The short description of the product (just as a reminder, the short description is a short summary of a product, can be added on any text element just adding the attribute:
itemshort-descriptionAdd to Cart
For add to cart you don't have to add any attribute you can just use the Add to cart of Webflow. However keep in mind that you will not be able to select a variable product from a Collection Item, the variations can be added to cart only on the Single Product Page.
Price
Is the price of the product, you can add it to text elements using the attribute:
itempriceRegular Price
If the product is on sale, the regular price is the full price, you can add it to text elements using the attribute:
itemregular-priceFormatted Price
This element will use the default function of WooCommerce to display prices, (it will combine both price and sale price, and ranges for variable products) you can add it to text elements using the attribute:
itemformatted-priceVariations
This is just a visual helper to make your client understand that the product has variations that can be selected inside the single page. To create this add a div with attribute:
itemvariationsInside this div add another div, this one will be the placeholder for the variation value, and will be populated with a background image (if you set images in WordPress following the path: Products > Attributes) or a text.
This structure is pretty dynamic, as an example if you have a product with 2 variation properties like: Color and Size, with respective values of (Red, Blue) and (M, L, XL)
the Div where you have the attribute will get duplicated 2 times once for Color and once for Size, while the div inside the one with the attribute will get duplicated 2 times for Color and 3 times for Size, creating a structure that should be like:
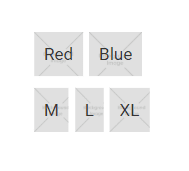
so keep it in mind when you create the design, use flex or grid thinking about this structure.
Attributes
For each Product you can assign various attributes, like color, size, etc..
This element can be added on any text using the attribute:
itemattributesThis text will be duplicated for each attribute you have set and will show in each of them a text in the format Attribute name: values as an example: Color: Red, Blue
So as example if in your product you have set the attributes: Color, Size, Material, you will get 3 texts like:
Color: red blue
Size: M, L
Material: Glass
Attribute
For each Product you can assign various attributes, like color, size, etc..
This element can be added on any text using the attribute:
itemattributeattributeslug of the attributeThis text will be duplicated for each value of the attribute you have chosen, so for example if you set:
itemattributeattributecolorAnd in your product you have 3 values like Red, Blue, White you will get 3 texts.
On each text also the adapter adds an html attribute called data-attribute-slug with the slug of the value, so you can further customize it with custom css.
Note that the attribute is inserted in the element with class Attribute Value, is wrapped inside a flex just for style! Don't forget to change the value color to your actual needs
Rating
Rating is an integer number that goes from 0 to 5. You can use the attribute:
itemratingon any element you want, it will be repeated automatically based on the rating. (e.g if you put this attribute on a star image, and you have a rating of 4 for that product you will get 4 star images ⭐⭐⭐⭐)
Total Sales
Is the number of sales made for that product, you can use it on text elements using the attribute:
itemtotal-salesReviews Count
Is the number of reviews made for that product, you can use it on text elements using the attribute:
itemreview-countFeatured
You can add the following attribute on every element you want, and it will be showed only the product is set as featured
itemfeaturedOn Sale
You can add the following attribute on every element you want, and it will be showed only the product is on Sale
itemon-saleSKU
The sku is an identification of certain product you can add it to texts, using the attribute:
itemskuDate & Time
To add an indicator about the date or the time of pubblication of the product, you can add respectively the following attributes:
itemdateitemtimeThe date and time format can be changed globally from WordPress Settings > General, respectively in sections named Date format and Time Format. However if you need to change the format locally for your current design needs you can add the optional attribute:
formatdate/time formatFor the date/time format, WordPress uses the native PHP function, this the complete format table.
As Example if you set the attribute:
formatF j, Y, g:i aThe date will be in the format: March 10, 2020, 5:16 pm
To/From Sale Date
If you have scheduled a sale in the feature you can add some visual indicators for the starting and ending date of the sale using respectively:
itemfrom-sale-dateand
itemto-sale-dateThe date and time format can be changed globally from WordPress Settings > General, respectively in sections named Date format and Time Format. However if you need to change the format locally for your current design needs you can add the optional attribute:
formatdate/time formatFor the date/time format, WordPress uses the native PHP function, this the complete format table.
As Example if you set the attribute:
formatF j, Y, g:i aThe date will be in the format: March 10, 2020, 5:16 pm
Main Category
Thanks to the Udesly plugin, you can select a Main Category attached to each product, you can create with these feature a simple tag button that links to the main category of the product, just add on a link the following attribute:
itemmain-categoryDon't forget to set up the main category in each product, it's not automatic.
Product Dimensions
Product can have different dimensions associated to it, they can all be added on text elements, using respectively the attributes:
- Length
itemlength- Width
itemwidth- Height
itemheight- Weight
itemweightCategories
This is the list of categories of the product add it on a link element, this element will be repeated once for every category that is attached to the product. To use it use the attribute:
itemcategoriesOptionally you can also add the following attribute to limit the number of categories to show:
limitnumber of categoriesFor example to show only first 3 categories add:
limit3Tags
This is the list of tags of the product add it on a link element, this element will be repeated once for every category that is attached to the product. To use it use the attribute:
itemtagsOptionally you can also add the following attribute to limit the number of categories to show:
limitnumber of tagsFor example to show only first 3 tags add:
limit3Author
Every product has one Author attached to it, an author has a lot of data that can be customized, let's see it in action! You will find the elements dived on the element they can be used on: Images, Texts and Links.
Author Images
Actually the only Author data that can be used on images is the author Avatar, WordPress uses a system called Gravatar for its avatars, your authors can change the profile image creating an account on Gravatar using the same email. To show it, use an image or a div for background image with the attribute:
- Avatar
itemavatarAuthor Texts
There are a lot of datas that can be used on text elements, they are pretty autoexplicative, just add the attributes you want to use on text elements:
Display Name
itemauthor-display-nameNickname
itemauthor-nicknameFirst Name
itemauthor-first-nameLast Name
itemauthor-last-name-
Description
itemauthor-description
Author Links
With Links instead we can use the link to the author page (that is the archive page with all the products written by the author) and his social links. You can add social links in WordPress under the Users panel
Email
itemauthor-emailFacebook
itemauthor-facebookLinkedin
itemauthor-linkedinYoutube
itemauthor-youtubeTwitter
itemauthor-twitterDribble
itemauthor-dribbleInstagram
itemauthor-instagram-
Phone Number
itemauthor-phone